Material Needed
1. 12x12 yellow sheet of cardstock ( I used Bazzil Basics and the color is called "Glow")
2. 12x12 white sheet of cardstock ( I used Bazzil Basics)
3. 2 pieces of Pattern paper by Doodlebug Hello Spring line (1 of each color dots & chickadees)
I used 6x6 pad because the designs is smaller then 12x12 and they work perfect for making cards
4. Adhesive
5. Cutter
6. Cameo
7. Foam Adhesive Squares
8. Printer
Cut the yellow sheet of cardstock to 6x12 in.
Cut the white sheet of cardstock to 8.5x12
Cut the color dots pattern paper to 4.5x3.5 in.
Cut the chickadees pattern paper (light purple pattern) to 2x3.5 in.
The images I used are both from the Silhouette Studio software. They are listed below...
1. Center Panel Step Card by Lori Whitlock ... Design ID# 39775
2. Tweety with egg and chick by Looney Tunes (Print and cut)... Design ID# 26173
Now that you have all the material and the images...Here is Step by Step how to create this beautiful Easter Card!!
1. Open up the Card image in Silhouette Studio.
2. Ungroup images and move the smaller bracket label image to the side of the cutting mat (off mat).
3. Place images on the cutting mat in the software as shown. Then place the 2 different pattern papers and yellow cardstock that you already cut to the sizes mentioned above on your silhouette cutting mat.
4. Now cut the images out on your Cameo...make sure the cut setting is set to the appropriate settings (textured cardstock, and cutting blade set at 5).
5. Open up the Tweety image. Add the smaller bracket label image to the mat. Add the text "Happy" and then "Easter". (2 separate text boxes) The font I used was "Bradley Hand ITC". Change the font color to "Black"
6. Change the the text size of the word "Happy" to 43.1 & the "Easter" to 49.5. Make sure the dimensions are all correct...refer to the images below for the correct dimensions for each word and tweety.
7. Center tweety in the bracket label shape image and the word "Happy" above tweety and "Easter" below tweety...As Shown
8. Next click on the Cut style tab and Change all but the bracket label image to "No Cut" and then group all images together.
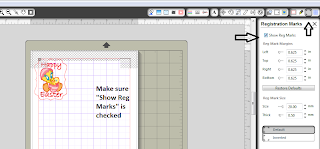
9. Change the paper size settings to 8.5000x11.000 in. and show registration marks.
10. Highlight the image and Fill the image on this page.
11. Send image to your printer and then put the printed image on your cutting mat.
12. Send image to Silhouette to cut. Click to skip printing..since we already printed, Click continue, Click detect registration marks automatically. Then after the registration marks are detected sucessfully then click Cut.
Now that everything is cut here is what you should have!
So now it is time to assemble the card! Yayyyyy :)
1. When the card was cut it cut dashes where the the card is the be folded. The folded card should look like this.
2. Adhere the 2 purples pieces and the color dot paper as shown below.
Tadaaaaa you now have a beautiful card!
THANK YOU FOR VIEWING MY POSTING/TUTORIAL!
Please leave a comment and let me know what you think and if you have any questions let me know!


